Synthesis with the Web Audio API - Envelopes
When we looked at monophonic synthesis in an earlier post on this blog the notes we played were produced by simply turning a Sine wave on and off using a Voltage Controlled Amplifier (VCA). In this post, we’ll look at how to make this sound a little bit more interesting by varying the amplitude of the oscillator over time by applying what is known as an “envelope” to the VCA.
In the earlier monophonic synthesis example we directly modified the
parameters of the nodes in the AudioContext graph based on key
presses. As the number of nodes and the complexity of the synthesis
increases though, the code can start to get unwieldy. Instead let’s
start by introducing some reusable objects that can be combined
together.
VCO
We start with a function that can be used to create Oscillators.
var VCO = (function(context) {
  function VCO(){
    this.oscillator = context.createOscillator();
    this.oscillator.type = 'sawtooth';
    this.setFrequency(440);
    this.oscillator.start(0);

    this.input = this.oscillator;
    this.output = this.oscillator;

    var that = this;
    $(document).bind('frequency', function (_, frequency) {
      that.setFrequency(frequency);
    });
  };

  VCO.prototype.setFrequency = function(frequency) {
    this.oscillator.frequency.setValueAtTime(frequency, context.currentTime);
  };

  VCO.prototype.connect = function(node) {
    if (node.hasOwnProperty('input')) {
      this.output.connect(node.input);
    } else {
      this.output.connect(node);
    };
  }

  return VCO;
})(context);
The Web Audio API calls in this function should look familiar. We
create an sawtooth OscillatorNode, and tell it to start immediately.
However the VCO object created by this class also does two new things.
In the lines
...
    this.input = this.oscillator;
    this.output = this.oscillator;
...
  VCO.prototype.connect = function(node) {
    if (node.hasOwnProperty('input')) {
      this.output.connect(node.input);
    } else {
      this.output.connect(node);
    };
  }
we’re specifying what the ‘input’ and ‘output’ nodes are for our
object, and defining a connect method that can behave in the same
way as ‘native’ Web Audio nodes. In this way, our custom VCO can be a
composition of a number of Web Audio Nodes but we’re still able to
write code such as
var myOscillator = new VCO;
var gainNode = context.createGain();

myOscillator.connect(gainNode);
We’ll use this pattern again in the future.
The second new pattern in this function is the use of events to set parameters
...
    var that = this;
    $(document).bind('frequency', function (_, frequency) {
      that.setFrequency(frequency);
    });
...
This provides a simple way of triggering multiple oscillator notes from a single keypress, for example.
Envelopes
An Envelope Generator on an analogue synth will generate a voltage that smoothly varies over time. The variation begins when the generator receives a trigger (usually from pressing a key on the keyboard), and the smoothly varying voltage that is created can then be connect to, for example a Voltage Controlled Amplifier, to vary the amplitude of an oscillator with each key press. By doing this, we can turn the monotonous on-off sound of an oscillator into something that sounds a little bit more like the percussive ‘twang’ of a guitar string, for example.
As the Envelope Generator simply generates a varying voltage, we can in fact use this voltage to control any part of our synth - for example, the frequency of an oscillator, or the cutoff frequency of a filter. Most commercial analogue synthesisers allowed envelopes to be used in this way, and the more expressive the synth the more options it had.
Luckily, in the Web Audio API almost every parameter of every Node
implements the AudioParam interface, which allows it to be varied in
limitless ways.
To begin with though, let’s consider a vary simple envelope generator, one that generates an Attack-Release (AR) envelope. Here’s a sketch of the voltage generated by this generator as a function of time
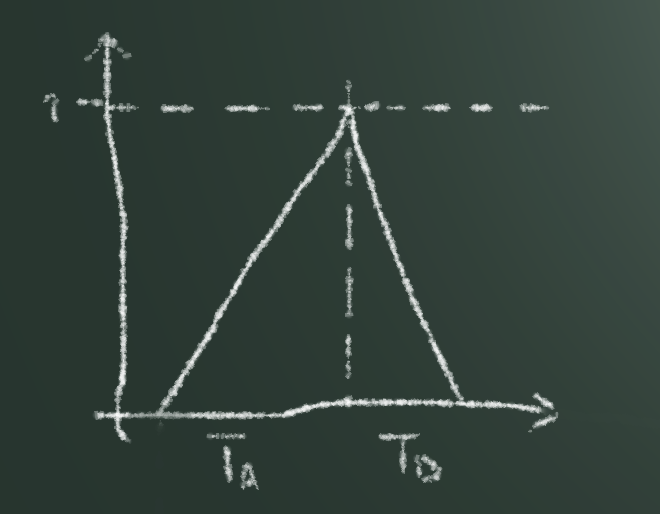
When the generator receives a trigger, the voltage starts at zero,
rises linearly to a maximum in TA seconds, then immediately falls
to zero in TD seconds. The first portion of the curve is called the
“attack”, the second part, the “release”.
The code for our Envelope Generator looks like this
var EnvelopeGenerator = (function(context) {
  function EnvelopeGenerator() {
    this.attackTime = 0.1;
    this.releaseTime = 0.1;

    var that = this;
    $(document).bind('gateOn', function (_) {
      that.trigger();
    });
    $(document).bind('setAttack', function (_, value) {
      that.attackTime = value;
    });
    $(document).bind('setRelease', function (_, value) {
      that.releaseTime = value;
    });
  };

  EnvelopeGenerator.prototype.trigger = function() {
    now = context.currentTime;
    this.param.cancelScheduledValues(now);
    this.param.setValueAtTime(0, now);
    this.param.linearRampToValueAtTime(1, now + this.attackTime);
    this.param.linearRampToValueAtTime(0, now + this.attackTime + this.releaseTime);
  };

  EnvelopeGenerator.prototype.connect = function(param) {
    this.param = param;
  };

  return EnvelopeGenerator;
})(context);
We have seen the event binding code before. The interesting part here
is the trigger method. Taking it line by line, we first establish
the current time
now = context.currentTime;In the Web Audio API, the context has it’s own timer, and a clock
which advances from the point the context is created. This clock is
vital for accurate timing of audio events, and for maintaining the
stability of those audio events even when, for example, there is a lot
of other activity in the browser window.
Any parameter, such as gainNode.gain, that implements the
AudioParam interface can have its value scheduled at a point in the
future with reference to the currentTime of the context. In case we
have already scheduled some changes to the value of the parameter we
have connected to the EnvelopeGenerator we first cancel those
scheduled events when we receive a new trigger
this.param.cancelScheduledValues(now);Our AR envelope starts at zero, so we first schedule the value of the parameter to zero immediately
this.param.setValueAtTime(0, now);The attack portion of our AR envelope is a linear increase to the
maximum value (1, in this case). The linearRampToValueAtTime method
handles the smooth transition for us, we just need to specify the
value to ramp to, and the amount of time the ramp portion should last
this.param.linearRampToValueAtTime(1, now + this.attackTime);And finally, we call the same method again to ramp the value to zero at the end of the envelope. Remember, we’re scheduling all of these changes for the future, so we need to specify the time at which the parameter should be ramped to zero, which is the sum of the attack time and the release time.
this.param.linearRampToValueAtTime(0, now + this.attackTime + this.releaseTime);The linearRampToValueAtTime method is only one of several methods
which can be used to create a variety of envelope shapes. Take a
look at the spec
for details.
Putting it all together
To add this envelope to our monophonic synth, we need to re-write the
VCA to expose the gain parameter of the gainNode through an
interface and then connect this up to the envelope. The VCA code looks
like
var VCA = (function(context) {
  function VCA() {
    this.gain = context.createGain();
    this.gain.gain.value = 0;
    this.input = this.gain;
    this.output = this.gain;
    this.amplitude = this.gain.gain;
  };

  VCA.prototype.connect = function(node) {
    if (node.hasOwnProperty('input')) {
      this.output.connect(node.input);
    } else {
      this.output.connect(node);
    };
  }

  return VCA;
})(context);
And the connections between our objects is quite simple
var vco = new VCO;
var vca = new VCA;
var envelope = new EnvelopeGenerator;

vco.connect(vca);
envelope.connect(vca.amplitude);
vca.connect(context.destination);
Try out this simple monosynth with an AR envelope. I’ve used the jQuery Knob library to allow the attack and release of the envelope to be set. Take a look at the code of the demo to see how that’s done.
There are many more sophisticated envelope types that were commonly used on classic analogue synths, and many ways in which envelopes could be used to creatively modify sounds. We’ll look at this and more in future posts. Subscribe to the RSS feed or follow me on Twitter to find out when I’ve written some more!